1.5.3. Administer local computer
1.5.3.4.
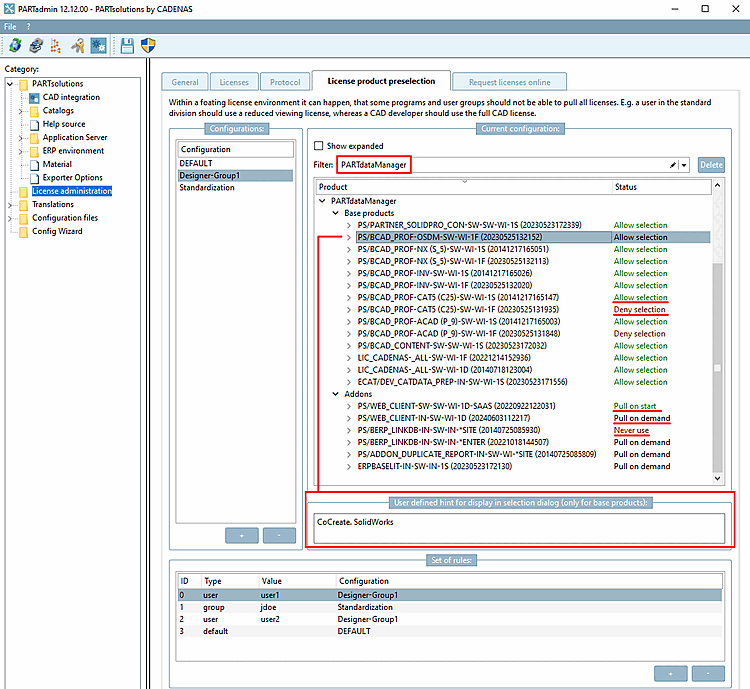
Tabbed page "License product preselection"
|  |
| Prev | Next |
PARTadmin -> License management [License administration] -> Local computer -> License product preselection tab page
Inside of Floating license environments it can happen that you want or have to use different purchased products for the one installation depending on program and user group. So a person in the standardization department can possibly work with a reduced license, however a person in the construction has to work with an extended license.
On the License product preselection tab page, you can change the following settings from the administration side[23] allow or prohibit specific license products for individual users or groups. In addition, it is of course more user-friendly not to display licenses that are not required in the first place.
![[Important]](images/important.png) | Important |
|---|---|
To set up the Licensed Product Preselection, [License product preselection] be sure to use a PARTadmin (arbitrary machine) from the 3Dfindit installation and not PARTadmin from the FLM installation. [24] | |
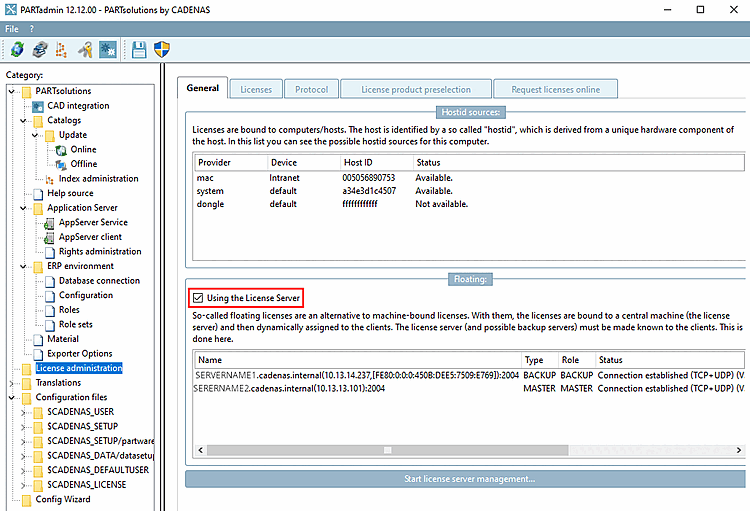
The License product preselection tab page is only activated if the Use FLM server checkbox has been activated on the General tab page. See the following figure.
Create the required areas in the Configurations dialog area using the button. For example: Standardization, Construction, etc. ("DEFAULT" is always created. If you do not make any personal settings, Default is used).
After you have clicked on , a new line appears. Double-click on the new line and enter the desired name in the input field.
In the second step, you assign the desired status [Status] to a selected configuration [Configuration] for each licensed product.
Select the configuration [Configuration] to be edited in the Configurations dialog area.
In the Current configuration dialog area to the right, you can see your license products sorted by modules (PARTdataManager, PARTbom, PARTdesigner, etc) and CAD interfaces.
You can open a list field for each license product by double-clicking on the displayed status [Status]. Use the arrow key to open the list and select the desired status [Status].
For basic products [Base products]:
Example: Assuming that the standards body always requires the license for the geometric comparison, set Occupy at start [Pull on start].
Example: Assuming the catalog developer never needs the license for the geometric comparison, then set Never use. This ensures that a license is not used unnecessarily and is not available to others who really need it.
Self-definable hint for selection dialog at startup [Define a hint for the product selection dialog on application start here]:
Now assign users or groups to a configuration in the Rules [Set of rules] section.
In the dialog area Note for selection dialog [Hint for product selection dialog] (see Fig. „ License product preselection “), you can optionally create a separate note text for each individual license.
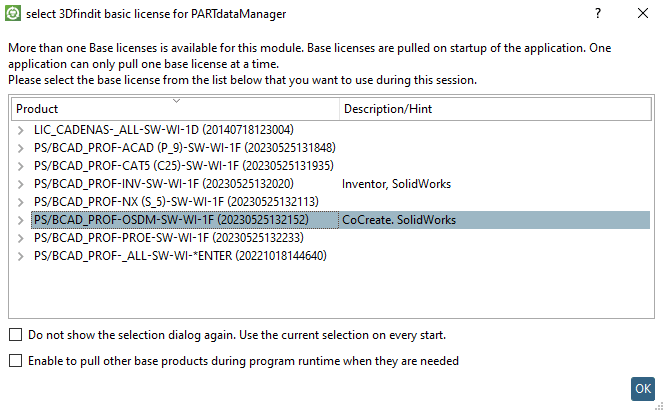
This is then displayed next to the product code in the selection dialog when the module is started. See Fig. „Example: Select 3Dfindit basic license for PARTdataManager“.
Save your settings. Overwrite license preselection [25]
The effect of the settings is shown when a module is started.
The dialog box PARTsolutions Select basic license for <module name> then appears.
Select the desired basic license and confirm with .[26]
If you always want to use the same basic license, activate the Do not show selection dialog again [Do not show the selection dialog again. Use the current selection on every start.] checkbox. Use the current selection at every start. [Do not show the selection dialog again. Use the current selection on every start.]
-> Now at module start no selection dialog box appears.
If users wish to change the selection later, they can access the corresponding settings option via ? -Menu -> Licenses (F9) -> License selection tabbed page -> Deactivate suppress interactive license selection dialog... [Suppress the interactive product selection dialog...] (see " Section 6.5.1.2, “ License selection " tab page ” ).
[23] The settings are not restrictive and can be further customized by the user in the respective module. See the " Section 6.5.1.2, “ License selection " tab page ” tab page.
The settings should not be confused with the restrictive access restrictions [Access control]. See Section 1.5.4.7, “Tabbed page "Access restrictions" ”.
[24] So if you are currently using the CADENAS FLM server, on the corresponding server, you must install the computer change.
Background: PARTadmin from the
FLM installation writes to the configuration file select_license.cfg under
%ALLUSERSPROFILE%/cadenas_flm/partsolutions/setup
and PARTadmin from the 3Dfindit installation to the
Configuration file select_license.cfg at
%cadenas_setup%.
[25] The settings are saved under $CADENAS_SETUP/select_license.cfg.
[26] Only basic products are displayed, no add-ons.