5.12.4.4.
Create class system / Change current class system... (Classes and features)
5.12.4.4.2. Building/editing class system |  |
| Prev | Next |
5.12.4.4.
Create class system / Change current class system... (Classes and features)
5.12.4.4.2. Building/editing class system | |
| Prev | Next |
In the first step, you set up the class structure. In the second step, you create characteristics (see next section ).
Under Filter, specify the class type for which the class structure is to be created (e.g. classes [Classes] or connection points [Connection points] ).
The selection options depend on which class types [Types of classes] were created when the class system was created on the Create class system -> Restrictions [Limits] Tabbed page dialog page.
Set up the class structure with the following context menu commands:
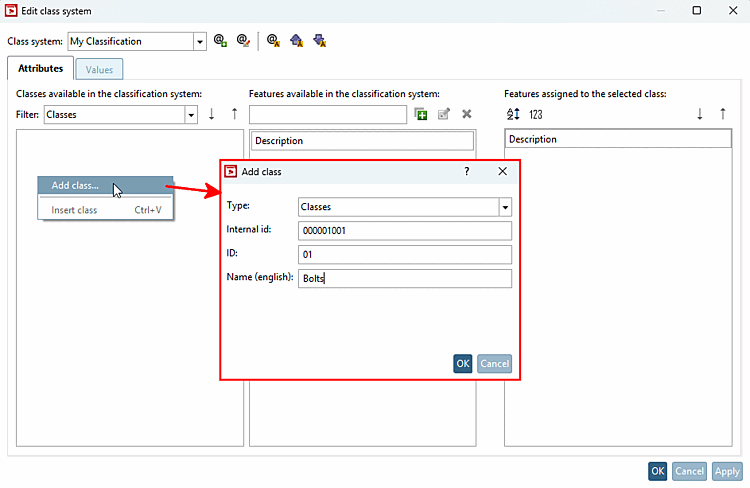
Example of creating a class structure:
In the empty field -> Context menu -> Add class...: ID "01" (already entered), enter the following under "Name (English)": "Bolts"
Context menu of "Bolts": Add subclass [Add subclass...]...: ID "01" (already entered), enter the following under "Name (English)": "Head cap bolts"
Context menu of "Bolts": Add subclass [Add subclass...]...: ID "02" (already entered), enter the following under "Name (English)": "Hexagon bolts"
Context menu of "Nuts": Add class...: ID "02" (already entered), enter under "Name (English)": "Nuts"
Context menu of "Nuts": Add subclass [Add subclass...]...: ID "01" (already entered), enter under "Name (English)": "Cap nuts"
Context menu of "Nuts": Add subclass [Add subclass...]...: ID "02" (already entered), enter under "Name (English)": "Hexagon nuts"
The result is the following view, for example:
![[Note]](images/note.png)
